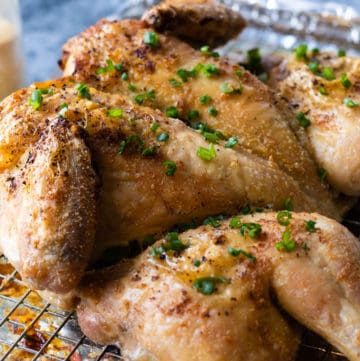
Easy 4 Ingredient Roast Chicken Without Butter
The best way to enjoy the natural flavours of a good quality chicken. This 4 ingredient chicken is so easy with just a few of my simple techniques. Crispy, savoury skin with tender flavourful meat, this will become a busy weeknight staple but equally a hit at any dinner party!
Equipment
- 1 rimmed baking tray
- 1 wire rack
- aluminum foil
- kitchen shears
Ingredients
- 3½-4 lb raw whole chicken (1.82 - 2 kg) (air chilled) (Note 1)
- kosher salt (Note 2)
- 1 Tbsp. garlic powder (Note 3)
- 1 Tbsp. olive oil (Note 4) (canola, vegetable or grapeseed oil)
Instructions
Dry Brine - Day Before (optional) (Note 5)
- Remove the chicken from its packaging, removing any giblets, neck and feet (if still attached).
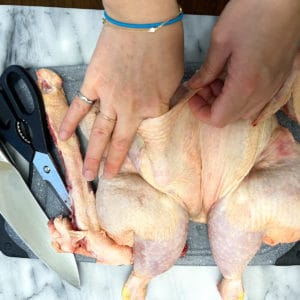
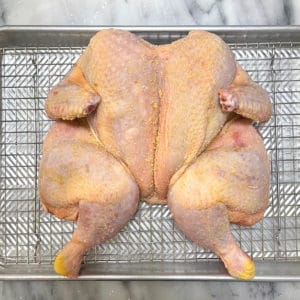
- Spatchcock/butterfly the chicken as described in this post, removing the spine with kitchen shears and flatting the ribcage so the chicken lays flat. (Note 6)
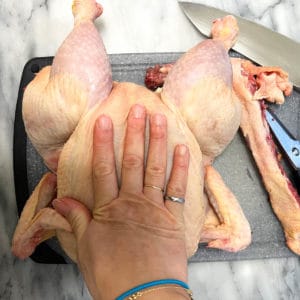
- Dry the skin as thoroughly as possible by blotting with a paper towel to remove as much moisture as possible. Remove any lingering blood clots, especially around the spine area.
- Separate the skin from the meat by placing one or two fingers from the neck and working your way down the breast to the bottom. Go from the bottom and work your way up. Work gently and carefully to not tear the skin. (Note 7)
- Sprinkle the salt all over the top of the chicken and underneath the skin (where you separated the skin from the breast)
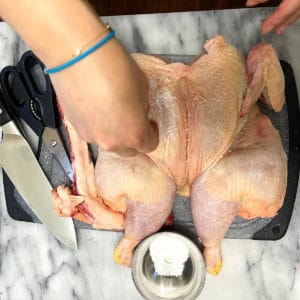
- Sprinkle garlic powder evenly all over the chicken.

- Line a rimmed baking sheet with aluminum foil and place a wire rack on top. (Note 8)
- Lay the chicken flat on the rack with the breasts in the middle of the pan and the legs outside.
- Place the chicken in your fridge uncovered overnight to dry. (Note 9)
Roast the Chicken - Day Of
- If preparing the chicken on the same day, follow the dry brine instructions above (Steps 1- 8). (Note 10)
- Take out the raw chicken about 30 minutes before baking. Let it sit at room temp for more even cooking. (Note 11)
- Preheat oven to 425°F/218°C.
- Rub the chicken all over and under the skin with oil.
- Put the entire tray into the oven for 35-40 mins depending on its weight. (Note 12)
- Using a meat thermometer. Check the thickest part of the breast close to the bone and make sure it reads 145°F (63°C). In the thickest part of the thigh close to the bone, check to make sure it reads at least 160°F (72°C).
- Let it rest uncovered in the tray for 10-15 mins before carving (temperature will continue to rise).
Notes
Notes
Note 1: This recipe doesn’t call for many ingredients so it’s important to get a good quality chicken since much of the flavour will come from it. I usually try to find a local, fresh (not frozen), grain-fed and air-chilled chicken. Organic if you can because it implies the chickens were raised more humanely and in a better environment. Make sure the packaging doesn’t have a lot of juices in it to know it hasn’t been accidentally frozen. Lastly, air-chilled means the chickens are cooled in blast coolers and not ice water. Chicken submerged in ice water retain the moisture and won’t brown and crisp as well. Note 2: Make sure you know how salty your salt is because some are saltier than others. The rule of thumb is ½ tsp/lb of Morton’s, Windsor, sea salt or 1 tsp/lb of Diamond Crystal. Note 3: Garlic and chicken go very well together and it’s a crowd-pleaser and kid-friendly. Plus I prefer the full flavor of the chicken to shine through. Feel free to use any of your favorite chicken dry rubs. Note 4: The oil will help your chicken cook more evenly. Any neutral oil with a high smoke point works well. Although not a high smoke point, olive oil works equally well. Note 5: Salting your chicken the day before will always produce a more flavorful chicken because it will be salted from within. Note 6: Spatchcocking/butterflying means your chicken roasts flat. This ensures the breast and thigh are cooked at the same time. You can also roast chicken without spatchcocking but the breasts will end up overcooked a bit. Brining helps keep the breast meat moist. Note 7: If you’re in a rush on the day of, you can skip separating the skin from the meat. This won’t skimp on flavor but will produce a less crispy skin. I often skip this part when I’m in a rush and salting and roasting the day of. Note 8: A baking sheet allows more even airflow than a roaster with high walls. This will avoid the underside of the chicken being soggy. I also think it’s way easier to wash. The wire rack is ideal but you can also roast directly on a baking sheet lined with aluminum foil or parchment paper. Note 9: Don’t place uncovered in your fridge for longer than 24 hours or you will risk the skin going papery and leathery. When taking out your chicken before roasting, you will notice the surface of the chicken drier and slightly more puckered from the day before. Note 10: If you’re seasoning and roasting your chicken on the same day. Season as soon as possible (up to 40 minutes before roasting) so you give the salt the time to do its job. The earlier you season the more flavorful your chicken will be. Salt right before baking if you have less than 40 minutes before cooking or else you risk drying out your chicken. Note 11: By bringing the chicken out from the fridge earlier, you let the surface warm-up and your chicken will brown much nicer. If you don’t have 30 minutes, any head start is better than none! Taking out the chicken is the first step and I leave it out while I prepare the rest of the meal. Note 12: Rule of thumb is 10-12 minutes for every lb. (22 - 26 minutes for every kg). I usually start checking at 35 minutes in and adding 5-7 minutes if it’s not quite up to temperature.Alternatives/Substitutions
Oil: Any oil with a high smoke point will work well for this recipe such as vegetable, canola, grapeseed and avocado oil. I also find olive oil works well too (even though it’s lower smoke point). Dry rub seasonings: Replace garlic powder with just cracked pepper and you have your classic simple roast chicken. Any dry herbs will work beautifully with this recipe. Italian, greek or cajun seasoning, paprika, cumin and/or 5 spice powder etc. I personally like using soy sauce and dried thyme in addition to the garlic powder for an east meets west fusion.Storing Tips
Store unused portions in an airtight container for up to 2 days in your refrigerator. Shred up leftover roasted chicken on a salad or add it to your next chicken noodle soup. Keep the chicken carcass for making stock for cooking.How to Freeze Roast Chicken
Break up your roasted chicken into smaller portions (i.e. breast, thigh, drumstick) and store in freezer bags removing as much extra air as possible. Unfortunately, freezing will create water crystals that will toughen up the meat and dry it out more. Dividing up the chicken into smaller portions freezes faster and minimizes ice crystal formation. Tried this recipe?Let us know how it was!