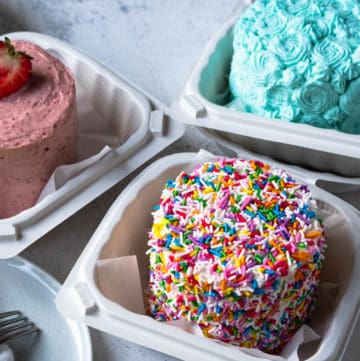
Mini Lunch box Cakes (Bento Cakes)
Lunch box cakes, also known as Korean bento cakes, are mini versions of full sized cakes. Perfect for a beginner home baker, these simply decorated cakes fit perfectly into a clamshell takeout box. This lunch box cake is a moist vanilla cake frosted with whipped cream, super delicious to enjoy all to yourself!Makes 3 two-tier lunch box cakes (3.5 inch x 3.5 inch x 3 inches)
Equipment
- stand mixer fitted with whisk attachment
- 9 inch x 13 inch baking pan
- parchment paper
- 3.5 inch cookie cutter
- off set spatula
- side scraper
- glass measuring cups (1 large and 1 medium) or bowls
- stainless steel mixing bowl
Ingredients
Vanilla Cake (from Recipe Tin Eats) (see Note 1)
- 2 cups all purpose flour
- 2 ½ tsp baking powder
- 1/4 tsp salt
- 4 large eggs (at room temperature)
- 1 ½ cups powdered sugar
- ½ cup unsalted butter (1 stick)
- 1 cup whole milk
- 3 tsp vanilla extract
- 3 tsp grapeseed oil
Soaking Syrup (Optional) (see Note 2)
- 1 cup water
- 1 cup white sugar
- 1 tsp vanilla extract
Whipped Cream Frosting
- 2 cups heavy whipping cream (35% MF)
- ½ cup powdered sugar
- 2 packs whipped cream stabilizer (optional) (see Note 3)
- 2 tsp vanilla extract
- ¼ tsp salt
Instructions
Prepare Oven, Baking Pans and Equipment
- Preheat oven at 350°F (180°C). Place rack in the middle of the oven.
- Grease 9 inch x 13 inch baking pan with melted better. Crisscross two pieces of long parchment paper to line the bottom and up the four sides.
- For the whipped cream frosting, place a stainless steel bowl and whisk attachments in fridge. (a cold bowl ensures success) (See Note 4 & 5)
Vanilla Cake Baking Instructions
Make Flour Mixture (Mix Dry Ingredients)
- Add flour, baking powder and salt in a large glass measuring cup (for easy pouring) and whisk to combine.
Make Egg Mixture (Beat Eggs with Powdered Sugar Until Light and Fluffy)
- Beat eggs for 30 seconds on speed 6 with your stand mixer. Put your powdered sugar in an easy pour measuring cup.
- While the mixer is going, pour the powdered sugar into the beating eggs.
- Increase the speed of your stand mixer to 8 and beat for at least 8 minutes. Stop the mixer briefly to scrape powdered sugar off the side of the bowl to mix thoroughly (if needed).
- Egg mixture should be off white, glossy and triple in volume when done.
Make Hot Milk Butter Mixture
- While eggs are mixing, cut the stick of butter into 1 inch chunks. Place the butter and milk into a microwaveable cup and heat on high for 2 minutes (stirring halfway). Milk and butter should be foamy and hot.
Combine Cake Batter
- While the milk butter is heating, add the flour mixture in 3 rounds to the finished egg mixture. For rounds 1 and 2, mix for 5 seconds or less on speed 1 to lightly incorporate. For round 3, mix for 10 seconds or less until flour is JUST combined and you no longer see dry flour. It's ok if you see clumps. If you see any flour along the sides of the bowl, take a spatula and scrape it in and mix it in gently by hand.
- Combine hot milk butter mixture, vanilla and oil into the now empty flour mixture measuring cup. Put approximately 2 ladles of the flour/egg mixture into the hot milk butter mixture. (see Note 6)
- Temper this mixture by whisking it to thoroughly combine (don't worry about overmixing here, you're tempering the hot milk).
- Add this tempered mixture to the rest of the flour/mixture to make the finished batter. On speed 1, mix for 10 seconds or less until JUST combined. Don't overmix!
Bake the Vanilla Cake
- Pour finished batter into prepared 9 inch x 13 inch baking pan.
- Knock out big air bubbles by banging the baking pan 3 times on the counter.
- Bake for 25-30 minutes. An inserted toothpick should be clean with a few crumbs attached.
Transfer and Cool Cake
- Cool in baking pan for 15 minutes, then cover the cake pan with a cutting board. In one swift motion, flip the cake pan upside down. You should hear the cake release.
- Remove the cake pan and peel off the parchment paper. Cool completely.
Prepare Decorating Elements
Prepare Soaking Syrup
- While cake is baking, add water and sugar in a small saucepan. Heat on medium/low heat.
- Once sugar is completely dissolved. Remove from heat. Don't boil.
- Cool completely. Mix in vanilla.
- Store cooled soaking syrup in a bottle in the fridge.
Make Whipped Cream Frosting
- Remove your cold stainless steel bowl and whisk attachments.
- Pour the whipped cream into the bowl and whisk with a hand mixer on high for about 1 minute.
- Add the powdered sugar, vanilla extract and salt and continue whisking.
- When soft peaks start to form, add the whipped cream stabilizer (if using)
- Continue whisking on high until you start to see stiff peaks. Change to low speed and continue whisking. Watch carefully, as the whipped cream will come together fast. Overmixing will create butter.
- Once the whipped cream is formed, scrape down the sides of the bowl with a spatula and give one last mix. Cover and place in the fridge until needed.
Cake Decorating Instructions
Construct Your Lunch box Cakes
- Cut out 3 pieces of 5 inch x 5 inch parchment paper. These will serve as your base for decorating.
- Once the cake is cooled completely, use a 3.5 inch cookie cutter, make 6 round cutouts in the cake (see Note 7)
- Carefully remove the cut out cakes. Swap and pick out which 2 cut outs stacked together make the most leveled cake.
- Pour out 1/4 cup of soaking syrup (if using) into a dish with a brush. Take out whipped cream frosting from fridge. (See Note 8)
- On a 5 inch x 5 inch parchment paper, place a quarter sized dab of whipped cream frosting in the middle. Place your first cake cutout on top to prevent your cake from moving while decorating.
- Brush on soaking syrup over your cake (if using).
- Using an offset spatula, spread the frosting on top. I recommend at least half an inch thick. Place the second cake cutout on top and brush on more soaking syrup (if using). Make sure the cake is level. Add more frosting in between the layers if needed.
- Spread frosting evenly on top and on the sides of the cake. Use a bench scraper or your spatula to even out edges. Since the cake is so small, rotate the cake using the piece of parchment paper when smoothing out the frosting.
- Add sprinkles, candies or pipe decorations. Get creative!
Place Cakes in Lunch boxes
- Take your clamshell boxes and place it close to your cakes.
- Taking the edges of the parchment paper underneath your cakes, lift the cakes gently and place them into the clamshell boxes. You can also use a spatula to transfer the cakes over (I was able to do this without it)
Notes
Note 1: For more detailed instructions on the Vanilla cake, alternatives and substitutions, check out Recipe Tin Eats. The instructions I've laid out here is how I personally made this cake.
Note 2: Use a soaking syrup for the cake if you're making it ahead of time and storing your lunch box cakes in the fridge. Soaking syrup ensures the cake stays moist! This recipe produces more syrup than you need but use the leftovers for coffee or sweetening tea!
Note 3: I used 2 packs of Whip-It stabilizer. Each pack stabilizes 1 cup of whipped cream.
Note 4: You can also use the same stand mixer you used to mix your cake batter. Once you have the cake baking, clean the bowl and whisk attachments and place it in the fridge.
Note 5: If you're short on time, you can add ice inside a larger bowl and place your stainless bowl on top.
Note 6: If your hot milk butter was done heating while you were still adding the flour to the egg mixture, I reheated it again for an extra minute to make sure it was nice and hot before tempering.
Note 7: If needed, coat your cookie cutter with corn starch to avoid sticking. I personally didn't need to do this with this cake.
Note 8: You can separate your whipped cream frosting and add different food colorings for decorating!
Tried this recipe?Let us know how it was!